iWay Google Cloud Deployment Overview
Search form
The goal of this tutorial is to show how to deploy an iWay Application that was built by iWay Integration Tools in a previous tutorial to Google Cloud as shown here.
The Google Cloud Platform (GCP) is a collection of Google's computing resources, made available through services to the general public as public cloud offering.
The GCP resources consist of physical hardware infrastructure, such as computers, hard disk drives, solid state drives, and networking, contained within Google’s globally distributed data centers, where any of the components are custom designed using patterns similar to those available in the Open Compute Project.
This hardware is made available to customers in the form of virtualized resources, such as virtual machines (VMs), as an alternative to customers building and maintaining their own physical infrastructure.
This application consists of the following Docker containers:
- iWay Application exposing an API (defined through a RAML file) utilizing he iIT MongoDB Connector.
- MongoDB Server
Communication is managed between the two containers by using Kubernetes technology.
Kubernetes is an open-source system for automating deployment, scaling, and management of containerized applications.
This application is deployed on Google Cloud by utilizing a brand new Microsoft product called Google Kubernetes Service (GKE).
By utilizing technologies, Software as a Service (Saas) is managed by Azure Cloud.
Software as a service (SaaS) is a software distribution model in which a third-party provider hosts applications and makes them available to customers over the Internet.
SaaS is one of three main categories of cloud computing, alongside infrastructure as a service (IaaS) and platform as a service (PaaS).
What is GKE?
Kubernetes Engine is a managed, production-ready environment for deploying containerized applications. The Kubernetes Engine allows you to run Kubernetes quickly and efficiently, by completely eliminating the need to install, manage, and operate your own Kubernetes clusters.
Perform the following steps to enable the Kubernetes Engine API:
1. Visit the Kubernetes Engine page in the Google Cloud Platform Console.
2. Create or select a project.
3. Wait for the API and related services to be enabled. This can take several minutes.
4. Ensure that billing is enabled for your project.
You can use Google Cloud Platform Dashboard and Google Cloud Shell to complete the task.
Google Cloud Shell is a shell environment for managing resources hosted on Google Cloud Platform (GCP). Cloud Shell comes preinstalled with the gcloud and kubectl command-line tools.
-
gcloud provides the primary command-line interface for GCP.
-
provides the command-line interface for running commands against Kubernetes clusters.
Perform the following steps to deploy an application to the Google Cloud:
- Create a new project.
- Click Activate Cloud Shell, as shown in the following image.

- Set a default project by running the command from Cloud Shell, as shown in the following image.
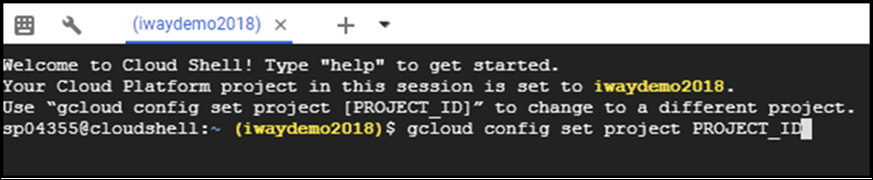
Where:
[PROJECT_ID]
Is your project ID.
- Set a default compute zone by running the command from a Cloud Shell, shown in the following image.
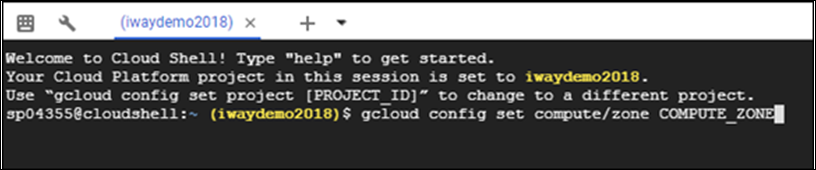
Where:
COMPUTE_ZONE
Is the desired geographical compute zone, such as us-west1-a. -
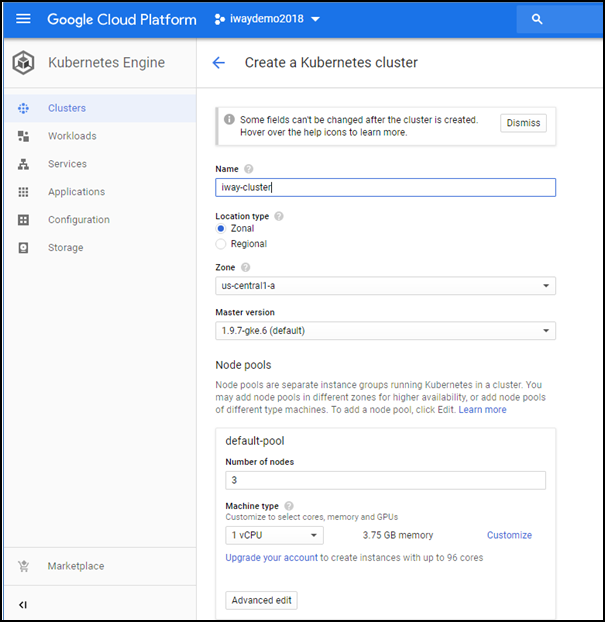
Create a Kubernetes Engine Cluster from the Google Cloud Platform Kubernetes Engine console, as shown in the following image.
Clusters can also be created from the shell using the following command:
gcloud container clusters create CLUSTER_NAME


Where:
CLUSTER_NAME
Is the name you choose for the cluster.
The following image shows a sample iWay cluster in a Kubernetes Engine console:

6. Get authentication credentials for the cluster.
After creating your cluster, you must get authentication credentials to interact with the cluster.
To authenticate for the cluster, run the following command, which configures kubectl to use the cluster you created:
gcloud container clusters get-credentials CLUSTER_NAME
This command configures kubectl to use the cluster your created.
Deploying an Application to the Cluster
In this section, you will launch an iWay API application to Google Cloud.
The process begins by creating a Google Storage Class, since Google Kubernetes Engine clusters are not created with any storage classes.
To deploy iWay API applications to the AWS Cloud:
1. Create storage by executing the following command:
kubectl apply -f gp2.yaml
The following syntax shows the file gp2.yaml:
apiVersion: v1
kind: PersistentVolumeClaim
metadata:
  creationTimestamp: null
  labels:
    io.kompose.service: gp2
  name: slow
spec:
  accessModes:
  - ReadWriteOnce
  resources:
    requests:
      storage: 10Gi
status: {}
The Cloud Console allows you to see persistent volume claim details, as shown in the following image.

2. Create the mongodb kubernetes pod:
kubectl apply -f mongodb-deployment.yml
The following syntax shows the file: mongodb-deployment.yml:
apiVersion: extensions/v1beta1
kind: Deployment
metadata:
  annotations:
    kompose.cmd: C:\Program Files\docker\kompose-windows-amd64.exe convert -f docker-compose.yml
    kompose.version: 1.12.0 (0ab07be)
  creationTimestamp: null
  labels:
    io.kompose.service: mongodb
  name: mongodb
spec:
  replicas: 1
  strategy:
    type: Recreate
  template:
    metadata:
      creationTimestamp: null
      labels:
        io.kompose.service: mongodb
    spec:
      containers:
      - image: bitnami/mongodb:latest
        name: mongodb
        ports:
        - containerPort: 27017
        resources: {}
        volumeMounts:
        - mountPath: /data/db
          name: slow
      restartPolicy: Always
      volumes:
      - name: slow
        persistentVolumeClaim:
          claimName: slow
status: {}
You can navigate to the Cloud Console to view the mongodb deployment details, as shown in the following image.

3. Create the myiway kubernetes pod:
kubectl apply -f deployment.yml
This Kubernetes command (kubectl apply), creates a new Deployment called:
myiway
The Deployment's Pod runs the iwaydocker/iwaydemo image in its container.
The following syntax shows the file deployment.yml:
apiVersion: extensions/v1beta1
kind: Deployment
metadata:
  name: myiway
  labels:
    app: myiway
spec:
  replicas: 1
  strategy: {}
  template:
    metadata:
      labels:
        app: myiway
    spec:
      containers:
      - image: iwaydocker/iwaydemo
        imagePullPolicy: Always
        name: myiway
        ports:
        - containerPort: 9999
        - containerPort: 9000
        - containerPort: 9001
        - containerPort: 8081
        resources: {}
      restartPolicy: Always
status: {}
You can navigate to the Cloud Console to view the myiway deployment details, as shown in the following image.

4. Create a kubernetes service for myiway. For example:
kubectl expose deployment myiway --name=myiway --type=LoadBalancer
5. Create a kubernetes service for the mongodb. For example:
kubectl expose deployment mongodb --name=mongodb --type=LoadBalancer
6. Navigate to the Google Cloud Console, then click Services, to see if myiway and mongodb kubernetes services where created successfully, as shown in the following image.

You can also execute the following command to list the running services:
kubectl get svc -o wide
7. Navigate back to the Cloud Console to view the deployments logs, as shown in the following images.


By using the address port number for the myiway service, you can visit the iWay Service Manager console:
EXTERNAL-IP

port 9999

8. Use the following address on port 8081 and iIT Explorer to post JSON documents into MongoDB database.
EXTERNAL-IP

9. Use the API endpoint to browse the posted document.
