4.1. Docker/Kubernetes
Search form
Docker/Kubernetes Deployment Overview
This topic describes how to build an iWay application for deployment through Docker/Kubernetes.
This application consists of two Docker containers:
- iWay Application exposing an API (defined via RAML file) which utilized the iIT MongoDB Connector
- MongoDB Server
We brought these containers up and managed communication between two by using Docker and Kubernetes technology.
Docker is the world's leading containerization platform
Kubernetes is an open-source system for automating deployment, scaling, and management of containerized applications.
I. How to use iIT to build and run an iSM container
Install Docker for Windows Edge
It will prompt you to make sure HyperV and Containers are enabled.
- This will require a reboot
- This took a long time
After Reboot Go to the task menu and type in Docker.
- You will see a Docker App.
- This must be run as an Administrator
- The Whale will show up in the Task bar
- Right mouse click on the Whale and select the menu item settings.
- Go to General
- Click on Expose daemon without TLS
Bring up a Command Prompt
Type in some commands:
- docker version
- docker run hello-world
- docker images
Create a sample Application Project with Docker and Kubernetes support.

Click Next. The Use Maven dialog opens, as shown in the following image.

Click Next. The Application Deployment dialog opens, as shown in the following image.

Click Finish.
Import the sample API application that is provided.

The application consists of two Docker containers:
- iWay Application exposing an API(defined via RAML file) which utilized the iIT MongoDB Connector
- MongoDB Server
This application has several APIs:

For example /companies/POST execute the following process flow with the MongoDB connector:

The Dockerfile is essentially the build instructions to build the image. The advantage of a Dockerfile over just storing the binary image (or a snapshot / template in other virtualization systems) is that the automatic builds will ensure you have the latest version available.


Runs a sample application : package -P docker-image

You should be able to build a docker image iway:latest:

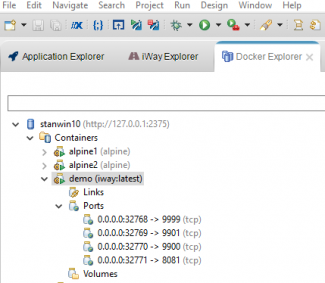
Now it is time to open a Docker Explorer to see this image.
Windows-->Show views--> Other-->Docker-->Docker Explorer

You have to provide TCP Connection URI: http://127.0.0.1:2375

Docker Explorer has 2 folders: Container and Images

Right click the image-->Show in-->Properties give you detailed image information:

Now you may run this image as a container.
Right click --> Run.
Provide a name of the container and click Finish:

Should see the following :

Go to Containers folder, refresh it and on the expand the demo container:
On port 9999, right button click -->Show in-->Browser you should see the console of the running application (there is no Registry menu any more)

This is the image that was build from the sample application and pushed into the Docker Hub.
Docker Hub is a registry service on the cloud that allows you to download Docker images that are built by other communities.
You can also upload your own Docker built images to Docker Hub.

This image will be used in Docker compose, kubernetes, AWS Cloud, Azure Cloud and Google Cloud iWay deployment.
II . Docker Compose Deployment
You may use my image or build your own…then change the as docker-compose.yml file accordingly
- Install docker-compose for windows
- Create a new empty file docker-compose.yml and copy into it the following:
version: '2' networks: app-tier: driver: bridge services: mongodb: image: 'iwaydocker/iwaydemo:latest' ports: - "27017:27017" volumes: - .:/iwaymongo networks: - app-tier myapp: image: 'iway:latest' links: - mongodb ports: - "9999:9999" - "8081:8081" - "9000:9000" - "9001:9001" networks: - app-tier - Copy the docker-compose.yml in the directory where it installed or add docker-compose.exe it to the path5.Use a sample iIT project provided
- Build the bundle
- Build the image package –P docker-image
- Run command: docker compose up -d
- Should start 2 containers
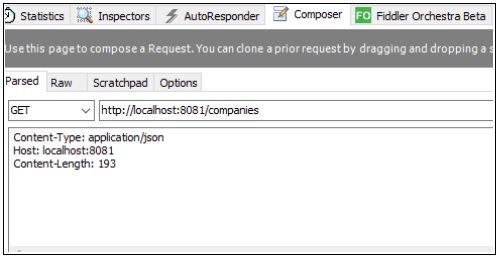
- Go to http://localhost:8081/companies/ end point
III. Kubernetes deployment
Create a new empty file deployment.yml and copy into it the following:
apiVersion: extensions/v1beta1
kind: Deployment
metadata:
 name: myiway
 labels:
 app: myiway
spec:
 replicas: 1
 strategy: {}
 template:
 metadata:
 labels:
 app: myiway
 spec:
 containers:
 - image: iwaydocker/iwaydemo
 imagePullPolicy: Always
 name: myiway
 ports:
 - containerPort: 9999
 - containerPort: 9000
 - containerPort: 9001
 - containerPort: 8081
 resources: {}
 restartPolicy: Always
status: {}
Create a new empty file mongodb-deployment.yml and copy into it the following:
apiVersion: extensions/v1beta1
kind: Deployment
metadata:
  annotations:
    kompose.cmd: C:\Program Files\docker\kompose-windows-amd64.exe convert -f docker-compose.yml
    kompose.version: 1.12.0 (0ab07be)
  creationTimestamp: null
  labels:
    io.kompose.service: mongodb
  name: mongodb
spec:
  replicas: 1
  strategy:
    type: Recreate
  template:
    metadata:
      creationTimestamp: null
      labels:
        io.kompose.service: mongodb
    spec:
      containers:
      - image: bitnami/mongodb:latest
        name: mongodb
        ports:
        - containerPort: 27017
        resources: {}
        volumeMounts:
        - mountPath: /data/db
          name: slow
      restartPolicy: Always
      volumes:
      - name: slow
        persistentVolumeClaim:
          claimName: slow
status: {}
---
apiVersion: v1
kind: PersistentVolumeClaim
metadata:
  creationTimestamp: null
  labels:
    io.kompose.service: mongodb-claim0
  name: mongodb-claim0
spec:
  accessModes:
  - ReadWriteOnce
  resources:
    requests:
      storage: 100Mi
status: {}
Run the following kubernetes commands:
-
kubectl create -f deployment.yml
-
kubectl create -f mongodb-deployment.yml
-
kubectl expose deployment myiway --name=myiway --type=LoadBalancer
-
kubectl expose deployment mongodb --name=mongodb --type=LoadBalancer
To check if everything is OK , you may run the following commands :
kubectl describe pods

kubectl get services:

How to scale kubernetes application:
Let's scale the Deployment to 2 replicas. We'll use the kubectl scale command, followed by the deployment type, name and desired number of instances:
-
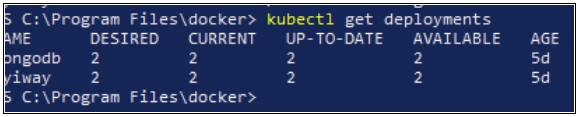
kubectl get deployments
NAME DESIRED CURRENT UP-TO-DATE AVAILABLE AGE
mongodb 1 1 1 1 3d
myiway 1 1 1 1 3d
-
kubectl scale deployments/myiway --replicas=2
-
kubectl scale deployments/mongodb --replicas=2
-
kubectl get deployments
-
kubectl get pods -o wide


You may want to show a kubernetes Dashboard where all Deployments, Pods, Replica sets displayed and user may drill down on those resources
-
kubectl create -f https://raw.githubusercontent.com/kubernetes/dashboard/master/src/deploy/recommended/kubernetes-dashboard.yaml>pre>
-
kubectl proxy
Kubectl will handle authentication with apiserver and make Dashboard available at http://localhost:8001/api/v1/namespaces/kube-system/services/https:kubernetes-dashboard:/proxy/.

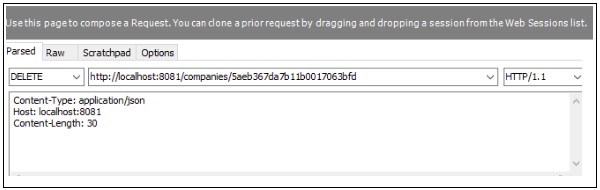
IV. How to test iway demo application using Fiddler, you may use Postman etc.
- POST - add new document
{
  "name" : "iWay Software",
  "tags" : [ "IT", "computer", "maintenance", "software" ],
  "address" : {
    "street" : "2 Penn Plaza",
    "zipcode" : "10121",
    "city" : "NY"
  }
}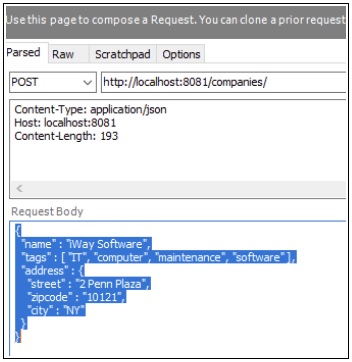
- GET - retrieve a document(s)

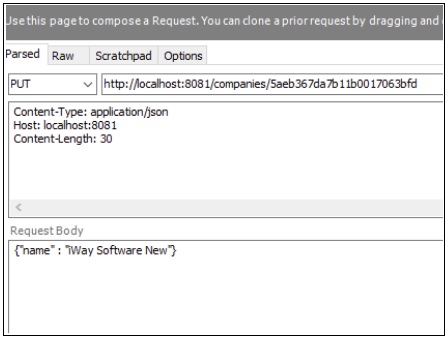
- PUT - update the document by ID (take company ID from the GET call). Result – name property of the company got updated.

- GET - retrieve a document by Company ID

- DELETE - delete a document by Company ID